Since I visit my hometown Singapore quite often to see my sister and her family, or stop off when travelling to do the same, I thought I'd do some research for cheapish prepaid mobile broadband plans to use while I'm there for short trips and came across this:
M1 Prepaid Mobile Broadband
Effectively for SGD$18 it gives you:
- 9 hours or 3 consecutive days of unlimited local data usage
- Access anywhere within Singapore at speeds of up to 7.2 Mbps*
- Convenience of short-term usage without a contract
This is great as for a short trip to Singapore you get unlimited mobile broadband access for 3 days (or 9 hours total if you connect and disconnect, but I can't see the benefit of this).
Compare this to the prepaid iPad plan for SGD$20 with only 1GB included (30 day expiry), it's better value for short trips 3 days and under, however the $20 iPad prepaid plan will be better value if you have low usage requirements and are on a longer stay.
All you really need is an unlocked mobile broadband USB dongle for your laptop, or an unlocked iPhone (or 3G iPad). However for iPhone 4 upwards, or for iPads you need a MicroSIM rather than a standard SIM that this service provides. I'll leave it as an exercise for the reader to work out how to
make a standard SIM fit into a MicroSIM slot.
Once you have trimmed the SIM into a MicroSIM format, you just need to configure your iPhone to use an alternate APN(Access Point Name) so that you can access data using the MicroSIM. Most iPhones (that are not jailbroken) you can't change the APN's as it's configured as part of the carrier settings (based on the sim card installed) so you'll have to install a custom file to change the APN. (Note: since all iPad's are effectively carrier unlocked, you can just manually enter the APN in the settings.)
Easiest way is to head to
unlockit.co.nz from your iPhone and follow the instructions (
choose 'Singapore' as the country, and M1(prepaid) as the carrier Note: seems like the website has the APN incorrectly set as 'prepaiddata' instead of 'prepaid' and I've emailed them to let them know, but in the interim use this file -
settings.mobileprovision but note that the certificate for this file will expire on 24/07/2012. I will update instructions if website is updated with correct data), and either download or email yourself the file. It's a
settings.mobileprovision file, and if you do not have access to the internet when you first get to Singapore, just be a good boy scout and email yourself the file and check your mail when you have internet access prior to landing in Singapore.
Quick steps for adding custom profile for Singapore M1 APN ʻprepaidbbʼ:
1) Open Email
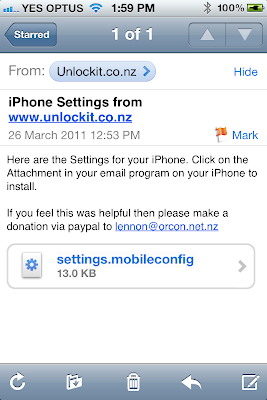
2) Click on attachment ʻsettings.mobileconfigʼ
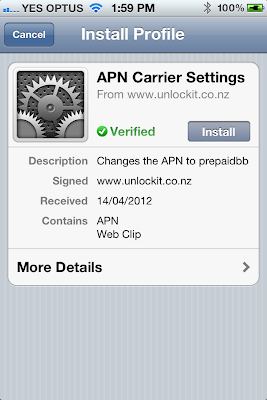
3) Click ʻInstallʼ
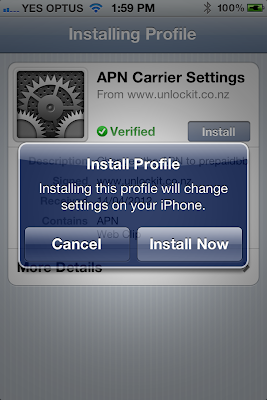
4) Click ʻInstall Nowʼ
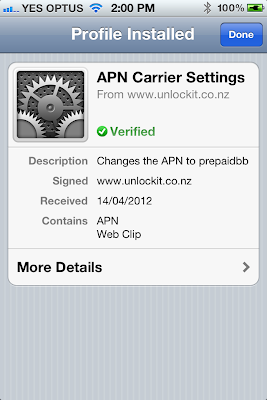
5) Click ʻDoneʼ and enjoy your mobile broadband!
Then when you are leaving Singapore, or just want to switch back to your normal SIM, follow the instructions below to remove the profile installed before.
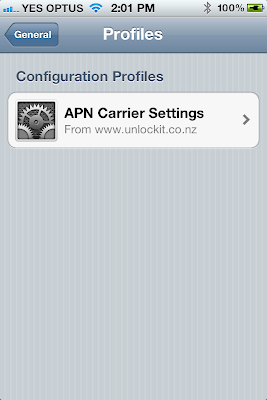
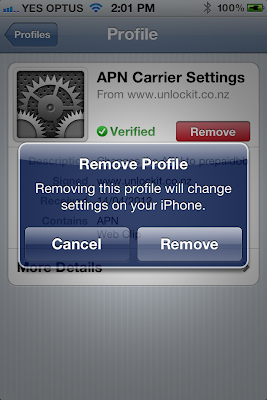
Quick steps for removing custom profile for Singapore M1 APN ʻprepaidbbʼ:
1) Goto Settings --> General --> Profiles

2) Select ʻAPN Carrier Settingsʼ
3) Click ʻRemoveʼ
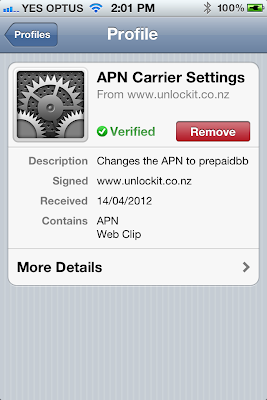
4) Click ʻRemoveʼ
Labels: Apple, IPad, iPhone, technical


